Measuring
How to Measure for Your New Window Blinds
Measuring for your new blinds couldn’t be simpler. It’s an easy way to save lots of money and takes just minutes; you’ll wish you’d done it sooner! All you have to do is follow our easy, step-by-step guides below.
Recess Fitting
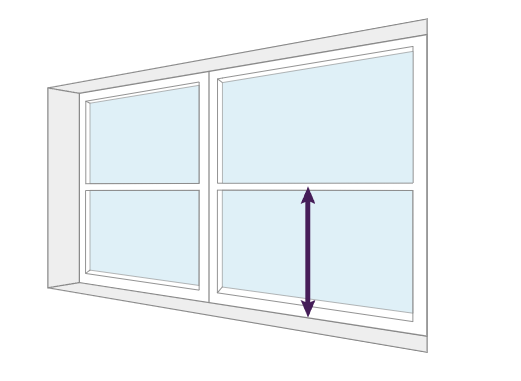
This is the measurement you need to take if you want your blind to fit inside the window recess. Measure the full width and height of the recess [the size of the hole if you like] and we will make the appropriate deductions to ensure a perfect fit.
Measure in 3 places for both the width and the drop, use the smallest measurements.
Top-Tip for Roller Blinds:
Measuring the width for roller blinds is slightly different, because the fabric is narrower than the full bracket-to-bracket width. For rollers, you can measure at the top of the recess for the best fit.Don’t make any deductions, we will do that for you to ensure your blind fits perfectly.
Use a metal tape measure, cloth ones can stretch and give you inaccurate measurements.
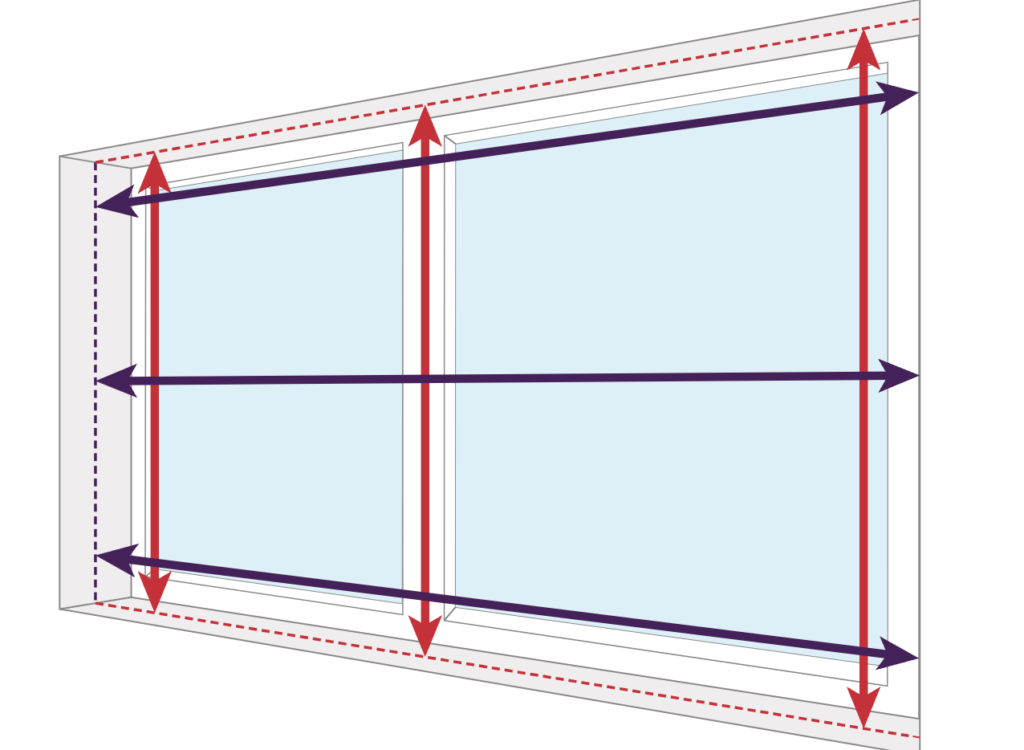
Top-Tips for Recess Fitting

Check that your recess is deep enough to fit the blind into, also bearing in mind any obstructions such as handles.
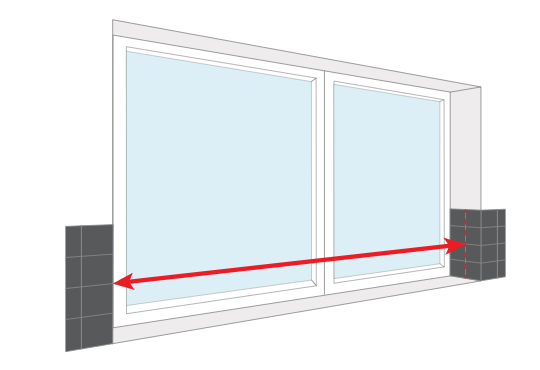
If you have tiles part-way up your recess (often the case in kitchens and bathrooms) then the space between them is most likely to be the narrowest point in the recess.
Measure between the tiles to ensure your blind will fit. You will need to top-fix or face-fix your brackets in this case.
Top-Tip for Roller Blinds:
Again, for roller blinds, it’s slightly different. Measure at the top of the recess and between the tiles, then compare those two measurements. If the difference between the two is less than 25mm, use the measurement at the top. If it’s more, use the measurement between the tiles.
Exact Fitting
This is the measurement you need to take if you want your blind to fit outside the window recess, overlapping on all sides. Measure the size of the recess, then add a little extra on all sides to ensure adequate coverage.
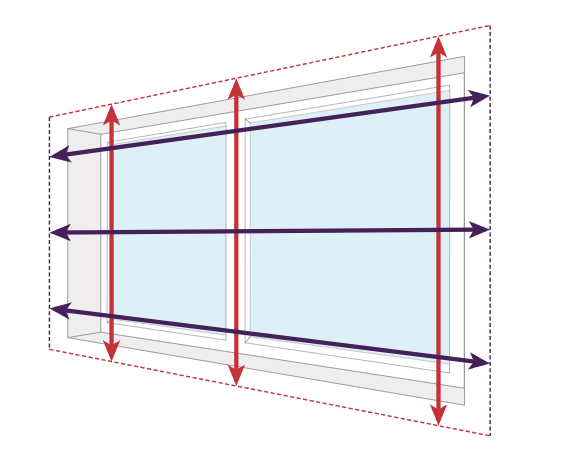
Measure the exact size of the area you would like the blind to overlap. To minimize light leakage we recommend that the blind overlaps the window recess by at least 70mm at the top and 50mm each side.
The overlap at the bottom of the blind is a matter of personal choice but please take into account obstacles such as radiators.
Use a metal tape measure, cloth ones can stretch and give you inaccurate measurements.
Top-Tip for All Blinds:
If you are replacing an existing blind with one of the same size, simply measure the blind (including its fittings) and specify exact fitting, we will make you one the same size.
Top-Tip for Roller Blinds:
The overall width of a roller blind, including its brackets, is approximately 35mm wider than the width of the fabric. You can choose whether to measure for the full bracket-to-bracket width, or for the width you’d like the fabric to cover.
Bay Windows
Measuring for bay windows couldn’t be easier, please choose the correct guide for your chosen blind type.
Angled Bay Instructions
Square Bay Instructions
Roof Windows
Every VELUX ®, Fakro, Dakstra and Rooflite roof window carries a data plate that details the code of the window. Check your window’s code number and simply select that when ordering your blind.
Some window manufacturers make the window code less obvious than others. If you can’t find the code plate or size of your window, simply measure the width and drop of the visible glass then give us a call, we’ll usually be able to identify the size code from the glass size.
Conservatories & BiFolding Doors
All of our ClickFIT, EasiFIT and PerfectFIT blinds fit neatly inside the frame of your window or door to effectively cover the visible glass. The little clips slot easily between the frame and the glass for a strong and secure hold on all UPVC double glazed windows and doors (and aluminium BiFolds in the case of ClickFIT blinds) with a rubber bead.
For accurate measurements, make sure you use a metal tape; cloth ones can stretch leaving you with inaccurate readings. Measure accurately to the nearest mm and remember to measure each window or door individually, don’t assume that they are all the same size!
Measuring for EasiFIT & ClickFIT Blinds
Simply measure the visible glass area of each window or door from the inside edges of the frame where the glass meets the rubber bead. Remember to use a metal tape measure, as cloth or plastic ones can stretch and give an inaccurate measurement.
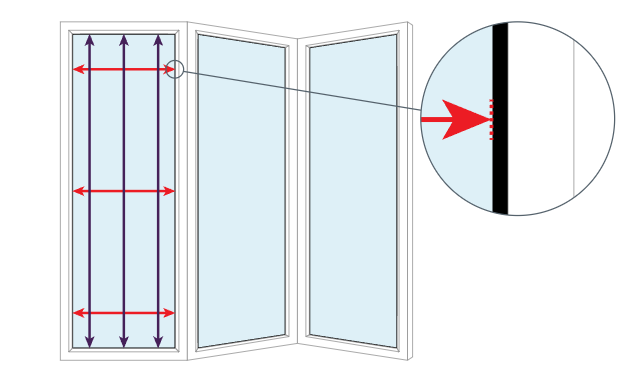
Only measure up to the edge of the rubber bead, don’t include it in your measurement.
Top-Tip:
Don’t forget to measure each window or door individually; don’t assume that they’re all the same size.
Measure the top, the middle and the bottom of the glass to the nearest mm and note down the shortest measurement.
Then simply repeat this step for the drop, measuring the left, the right and the centre. Again, take a note of the shortest measurement.
Measuring for PerfectFIT Blinds
Simply measure the visible glass area of each window or door. Remember to use a metal tape measure, as cloth or plastic ones can stretch and give an inaccurate measurement.

Only measure up to the edge of the rubber bead, don’t include it in your measurement.
Top-Tip:
Don’t forget to measure each window or door individually; don’t assume that they’re all the same size.
Measure from the inside edges of the frame where the glass meets the rubber bead. You shouldn’t include any of the beading or rubber seals in your measurements.
Measure the top, the middle and the bottom of the glass to the nearest mm and note down the shortest measurement.
Then simply repeat this step for the drop, measuring the left, the right and the centre. Again, take a note of the shortest measurement.
Next, measure the depth of the window from glass to beading. To do this, simply place a credit card over the corner of the frame and use a metal ruler to take the measurement. This will usually be between 18 and 24mm.
Top-Tips:
First, check the distance between the edge of the window beading and any obstructions, such as window handles. This should be more than 6mm. Don’t worry if it isn’t, there are ways around it so give us a call to place the order and we’ll go through it with you.
Check also that the rubber beading does not extend into the glass area by more than 6mm. Again, if it does, give us a call and we’ll run through your options.
Measuring for Shutters
We like to keep things simple here at Blinds 2go and our shutter measuring guide is no exception. Just follow these easy steps to measure your windows and you can save hundreds if not thousands of pounds on shutters making your home beautiful. Ready? Here we go…
Check for Squareness
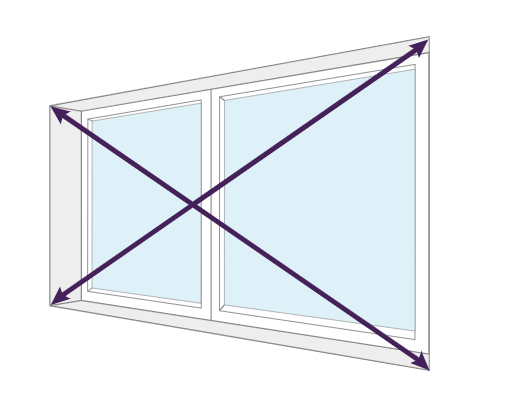
First of all, you need to check that your recess is pretty much square, making it suitable for our shutters. All you need to do is measure the recess diagonally from corner to corner on both sides. Then, compare the two measurements.
If the difference is 12mm or less, you’re good to go. If they vary by any more than that, then unfortunately you won’t be able to fit shutters in your recess. If this happens, don’t worry, there are plenty more fish in the sea, or, in this case plenty more blinds and curtains to choose from across our sites.
Ready to Measure?
First, decide where your shutters are going to sit. This can be at the front of the recess or inside the recess. Either way, measure at the place you plan to fit your shutters. Don’t worry about making any deductions, we’ll do all the maths for you.
Front of Recess Fitting
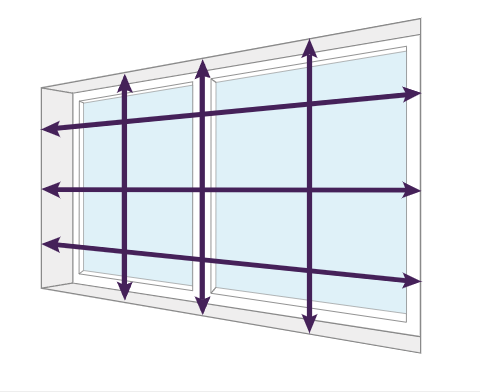
For a front of recess fitting you need to measure at the front of the recess. Measure the width at the top, middle and bottom.
Next measure the drop on the right, in the centre and on the left. Write down the smallest measurements, these are the sizes you will use to place an order.
Inside recess fitting
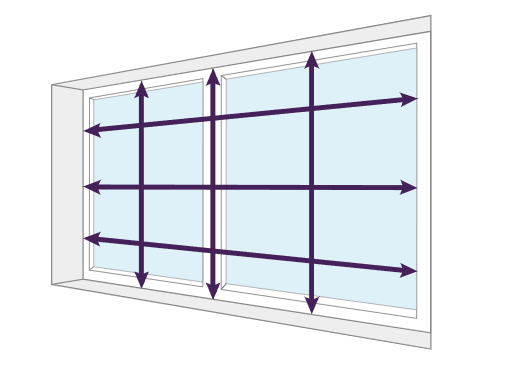
For an inside recess fitting, you can position your shutters anywhere you choose inside the recess, even flush against the window. Just make sure you measure far enough forward so that you avoid any obstructions such as window handles.
Mark where you are going to fit your shutters and measure the width and the drop in 3 places as you would for a front of recess fitting.
Measuring for a Mid Rail
For taller shutters over 1400mm we put in a stylish midrail to give your shutters some support. The great thing about a midrail is you can customise its height so that it looks best. Usually, people tend to position their midrails at the same height as any transom bars on their window.
There are just a couple of small restrictions when customising your midrail. For structural reasons they must be a minimum of 380mm and a maximum of 1300mm from both the top and bottom of your shutter panel.
To position your midrail, simply measure from the bottom of your recess to the midpoint of where you want it to sit. If this is level with your transom bar, measure from the bottom of the recess to the centre of the bar.
